
After I received my graphic card (Radeon RX 570 Series) from my cousin. So I started using Tensorflow and found out my training process was also extremely slow, like when training with my MacOS.
After reading some articles and being through many tedious days, I successfully set up my Tensorflow with Docker based on it. So in this article, I would like to share with you how to set it up in the most convenient way.
No more further instruction, let’s get started!
1. Install ROCm on Ubuntu
- Run the following code to ensure that your system is up to date:
1
2
3
4
sudo apt update
sudo apt dist-upgrade
sudo apt install libnuma-dev
sudo reboot
- Add the ROCm apt repository:
1
2
wget -q -O - http://repo.radeon.com/rocm/apt/debian/rocm.gpg.key | sudo apt-key add -
echo 'deb [arch=amd64] http://repo.radeon.com/rocm/apt/debian/ xenial main' | sudo tee /etc/apt/sources.list.d/rocm.list
- Install the ROCm meta-package:
1
2
sudo apt update
sudo apt install rocm-dkms
- Set permissions:
1
2
3
4
groups
sudo usermod -a -G video $LOGNAME
echo 'ADD_EXTRA_GROUPS=1' | sudo tee -a /etc/adduser.conf
echo 'EXTRA_GROUPS=video' | sudo tee -a /etc/adduser.conf
Restart the system
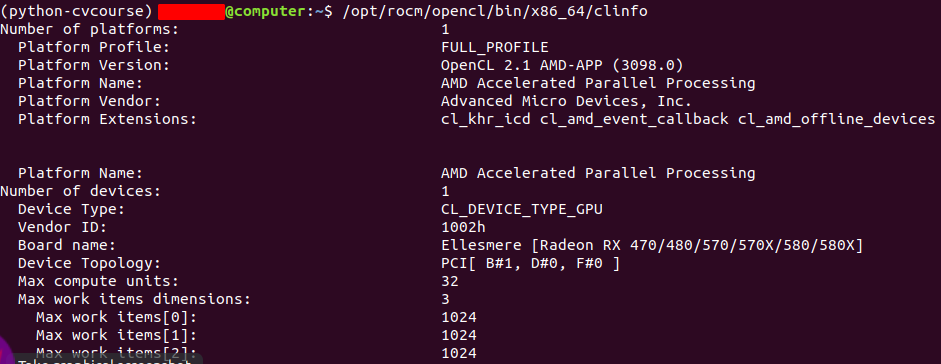
- Verify ROCm installation is successful:
1
2
/opt/rocm/bin/rocminfo
/opt/rocm/opencl/bin/x86_64/clinfo
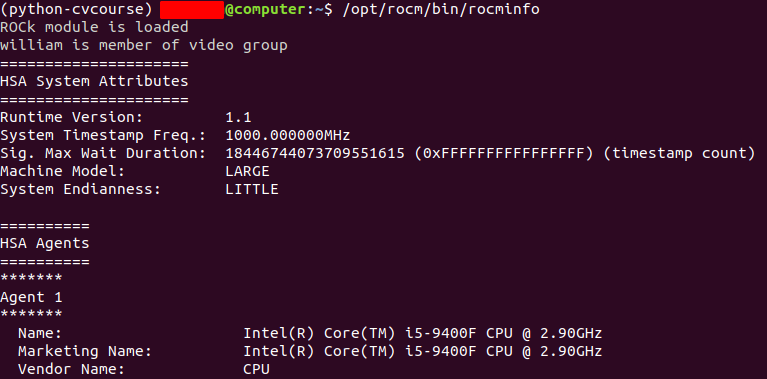
Note: To run the ROCm programs more efficiently, add the ROCm binaries in your PATH.
1
echo 'export PATH=$PATH:/opt/rocm/bin:/opt/rocm/profiler/bin:/opt/rocm/opencl/bin/x86_64' | sudo tee -a /etc/profile.d/rocm.sh
2. Install Docker
There are a ton of instruction in the Internet, but I recommend you to follow the steps which were written in this article.
3. Setup Tensorflow with ROCm
- Pull Tensorflow image (make sure your Docker is running):
1
sudo docker pull rocm/tensorflow:latest - Run container with Tensorflow image:
1
2
3
4
5
6
7
8
9
10
docker run -i -t \
 --name=tensorflow \
 --network=host \
 --device=/dev/kfd \
 --device=/dev/dri \
 --group-add video \
 --cap-add=SYS_PTRACE \
 --security-opt seccomp=unconfined \
 --workdir=/docker \
 -v $HOME/your-working-directory:/docker rocm/tensorflow:latest /bin/bash
Note: If you restart your computer, you could exec to your container using these 2 following commands:
1
2
sudo docker container start tensorflow # container name
sudo docker exec -it tensorflow /bin/bash
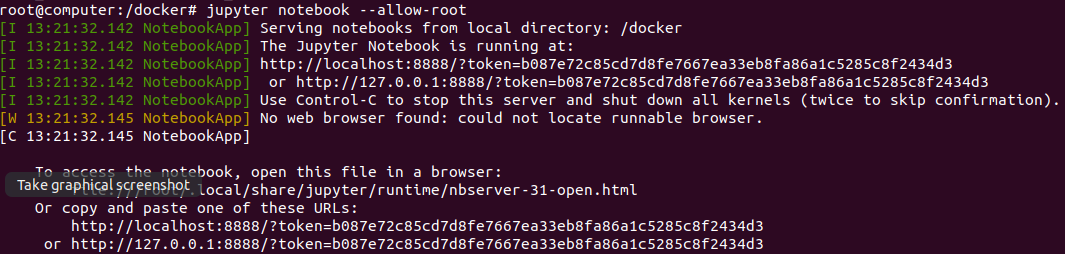
- Run Jupyter notebook:
1
jupyter notebook --allow-root
- Create a new notebook:

4. Run Tensorflow
In this tutorial, we will use Python to test our ROCm. (For someone who doens’t know Python, I encourage you to take some crash courses on the Internet).
We will test our ROCm with a basic neural network and MNIST dataset:
1
2
# Install required packages
!pip install cv2 numpy matplotlib
1
2
3
4
5
6
7
8
9
10
# Load libraries
from tensorflow.keras.datasets import mnist
from tensorflow.keras.utils import to_categorical
from tensorflow.keras.models import Sequential
from tensorflow.keras.layers import Dense, MaxPooling2D, Conv2D, Flatten

import os
import cv2
import numpy as np
import matplotlib.image as mpimg
1
2
# Load dataset by Keras mnist
(X_train, y_train), (X_test, y_test) = mnist.load_data()
1
2
3
# Categorize target
y_cat_train = to_categorical(y_train)
y_cat_test = to_categorical(y_test)
1
2
3
4
5
# Standardize features
X_train = X_train / 255
X_test = X_test / 255
X_train = X_train.reshape(len(X_train), 28, 28, 1)
X_test = X_test.reshape(len(X_test), 28, 28, 1)
1
2
3
4
5
6
7
8
9
10
11
12
13
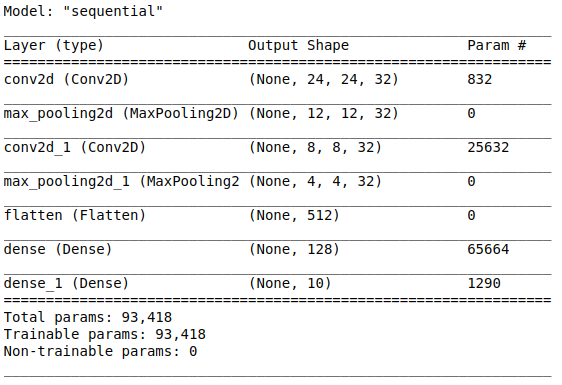
# Define model
model = Sequential([
Conv2D(filters=32, kernel_size=(5,5), input_shape=(28,28,1), activation='relu'),
MaxPooling2D(),
Conv2D(filters=32, kernel_size=(5,5), input_shape=(28,28,1), activation='relu'),
MaxPooling2D(),
Flatten(),
Dense(128, activation='relu'),
Dense(10, activation='softmax')
])
model.compile(loss='categorical_crossentropy',
optimizer='rmsprop',
metrics=['accuracy'])
1
model.summary()
1
model.fit(X_train, y_cat_train, epochs=3)

1
model.evaluate(X_test, y_cat_test)

1
2
# Save model
model.save('model.h5')
5. Summary
After going through various steps, we have our running Tensorflow in AMD GPU. It is worth for spending our time on doing this setup instead of wasting a ton of hours training without ROCm.
However, I also have some reviews after taking ROCm for a while:
- Darknet framework not yet supported (very famous for YOLO, a real-time object recognition model)
- It is not working with PyTorch (there are some bugs that can’t be fixed)
So, with weak cards, I think using Google Colab will be much more effective (11 GB GPU + 16 GB RAM). But if you have a strong AMD card, you should set up and then evaluate yourself.
Thank you for reading this article and keep researching :D.